Appearance
Paying suppliers
Accounting → Payment Voucher. Every payment you make leaves through a Payment Voucher — the bill you are settling, the rent, the electricity, a staff reimbursement. Money out is money out, which is why the screen lives under Accounting rather than Purchases.
Just want to pay one bill?
Pay a supplier walks the ordinary case end to end: open the bill, press Pay, approve, process. This page is the reference — the states, the two moments that matter, and the two tabs that page never opens.
Three states, and why
A payment voucher is not written the instant you decide to pay. It goes:
| State | Means | Money |
|---|---|---|
| Pending | Raised. Someone asked for this to be paid | Still in your bank |
| Approved | Someone decided yes | Still in your bank |
| Processed | Paid | Gone |
A voucher you type from scratch starts one step earlier, at Draft, and Submit turns it into a request. Paying from a bill skips that, because pressing Pay is already the request.
Working alone, all three are you, and it can feel like ceremony. It is worth keeping anyway: the split is what stops a bill being paid twice, and the moment you have staff it is the difference between an assistant asking for a payment and you releasing it.
Two ways out instead of paying: Reject (no, don't pay this) and Void (cancel one already approved). Neither leaves money moved.
Two things settle at different moments
The bill is marked Paid as soon as you request the payment — its balance is committed to that voucher, so nothing else can pay it by accident. The money leaves at Process. If your bank balance looks wrong, check whether the voucher is still sitting at Pending or Approved.
Paying part of a bill
The Pay dialog pre-fills the full outstanding balance. Type a smaller number and the rest stays owing — the bill comes back to the list with its balance reduced, and you pay the remainder later on another voucher.
You cannot pay more than is outstanding.
One payment covering several bills
You rarely pay bills one at a time. Batch PV settles as many as you like with a single voucher — and a single line on your bank statement.
Batch is per payee
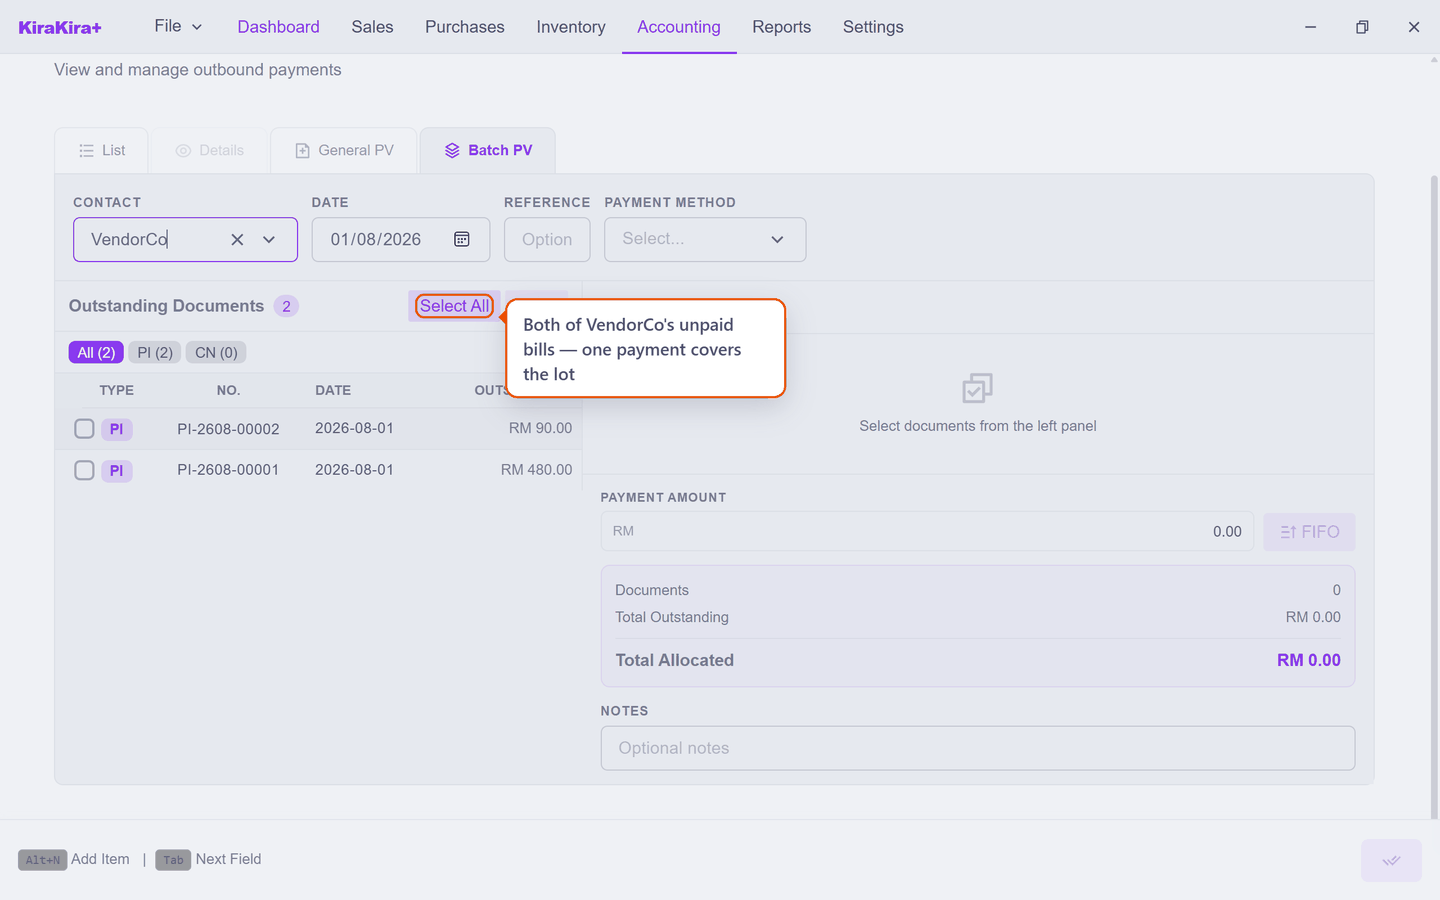
It asks who you are paying before it lists anything, because one payment goes to one person. Bills from two different suppliers need two vouchers.
Two things on this screen are worth knowing:
- The PI / CN filters. The list offers the supplier's credit notes as well as their bills. Tick both and the credit is netted off — you pay the difference, which is what actually leaves your bank.
- FIFO. Type a lump sum into Payment Amount and press FIFO, and KiraKira+ spreads it across the ticked documents oldest-first. Useful when you are paying "RM 2,000 off the account" rather than specific invoices.
Total Allocated is the figure to check before saving — it is what you are actually paying.
Paying something with no bill
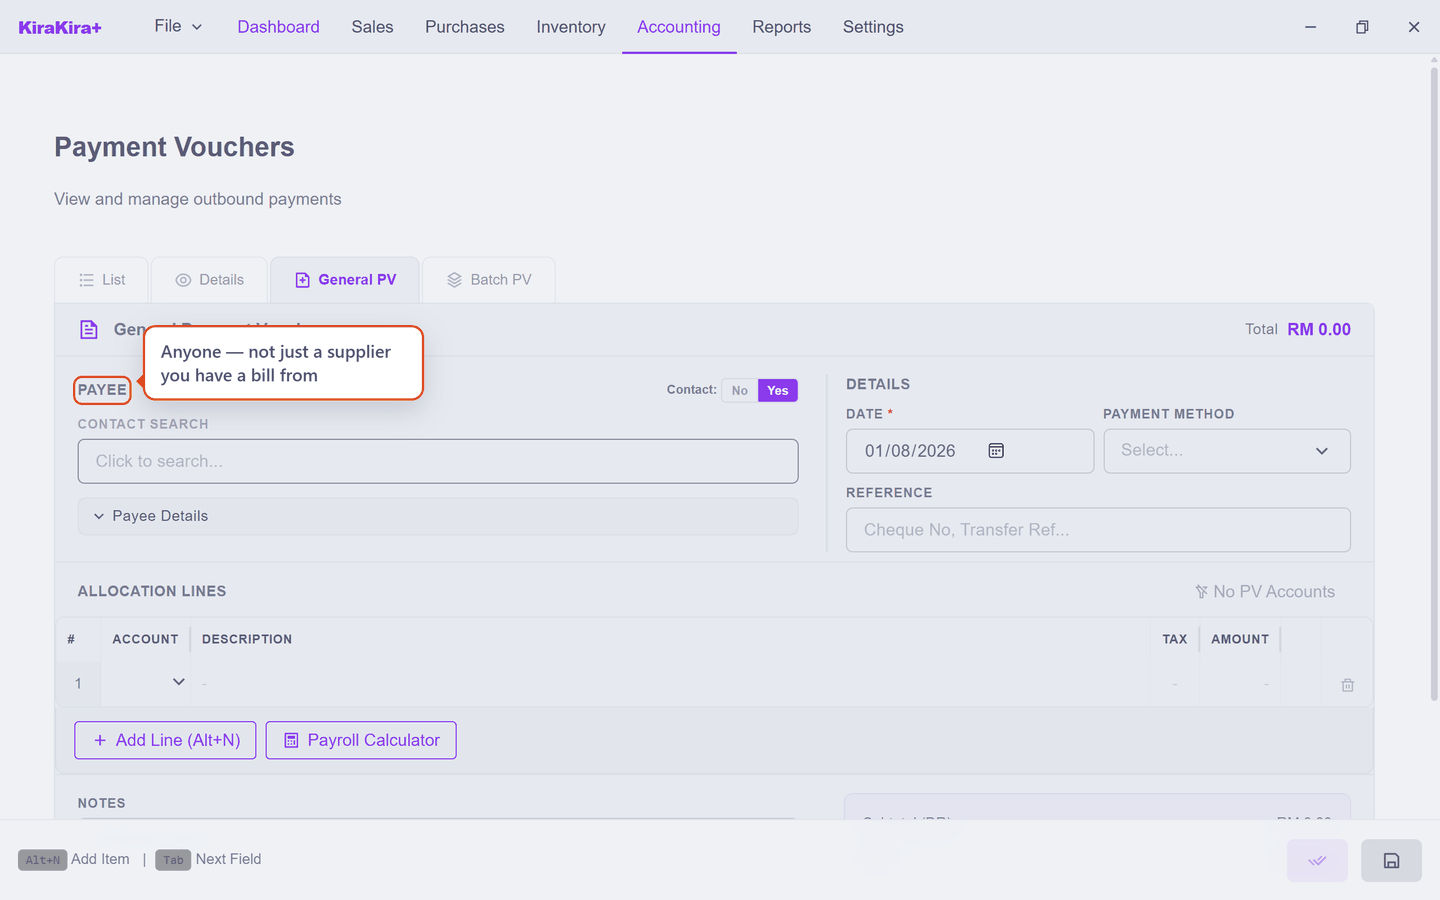
Rent. Electricity. A staff reimbursement. Nothing was ever entered as a supplier bill, and it does not need to be — that is what General PV is for.
| Field | What it does |
|---|---|
| Payee | Who is being paid. Switch Contact to No for a one-off — the landlord you pay monthly need not be a saved supplier |
| Payment Method | Which account the money leaves from. Required |
| Reference | Your cheque or transfer number |
| Allocation Lines | Which expense account each part of the payment belongs to |
The difference from an ordinary voucher is the lines: instead of pointing at a bill, you say what the money was for. One payment can be split across several accounts — RM 900 as RM 700 rent and RM 200 service charge.
The account list is long — type to narrow it
Clicking Account opens your whole chart, and it shows a screenful at a time starting from your asset accounts. An expense account is a long way down, so it will not be on screen when the list opens. Type part of its name and the list narrows to it. Nothing is hidden from you — it is simply a long list.
No suitable account? Create it first
You cannot code a payment to an account you do not have, and a new set of books starts with a deliberately short chart — there may be no Rent Expense in it at all. Add it in Accounting → Chart of Accounts before writing the voucher; the scenario below does exactly that, step by step.
With no bill behind it, the expense is dated here
A supplier bill records the expense on the day the supplier billed you, and pays it later. A general voucher does both at once, on the payment date. Where the bill and the payment fall in different months, raise the bill properly instead — otherwise your monthly profit moves with your bank account rather than with the work.
Scenario — Seri Maju pays two VendorCo bills with one transfer
Two bills are outstanding: PI-2608-00001 for RM 480.00 and PI-2608-00002 for RM 90.00. One bank transfer will clear both.
1. Accounting → Payment Voucher, then the Batch PV tab. In Contact, choose VendorCo — nothing is listed until you say who you are paying. Its unpaid documents appear: Outstanding Documents 2.
2. Set Date to the day the transfer leaves, choose the Payment Method (the bank account the money goes from), and put the transfer number in Reference so you can match it against the bank statement later.
3. Press Select All — or tick the two bills individually.
4. Click Payment Amount and type 570. It reads 0.00 until you do, and while it disagrees with the ticked bills the voucher says Over-allocated and will not save.
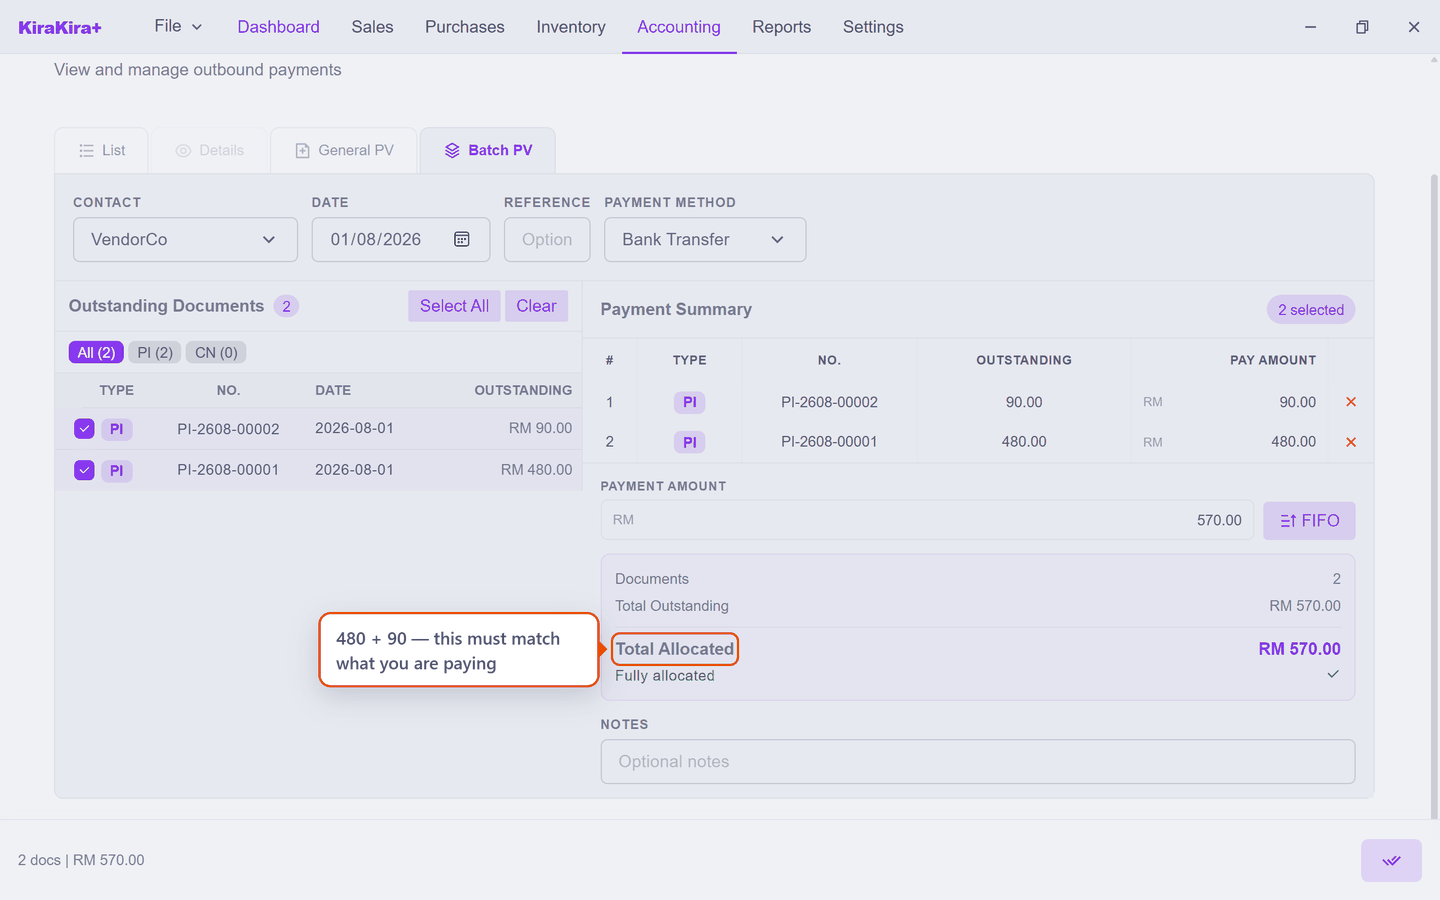
5. Check Total Allocated reads RM 570.00 — 480 plus 90 — then press the confirm button (bottom right) to raise the voucher.
6. The voucher exists at Pending. Nothing has left your bank yet, but both bills already show as Paid — committed to this voucher, so nothing else can pay them.
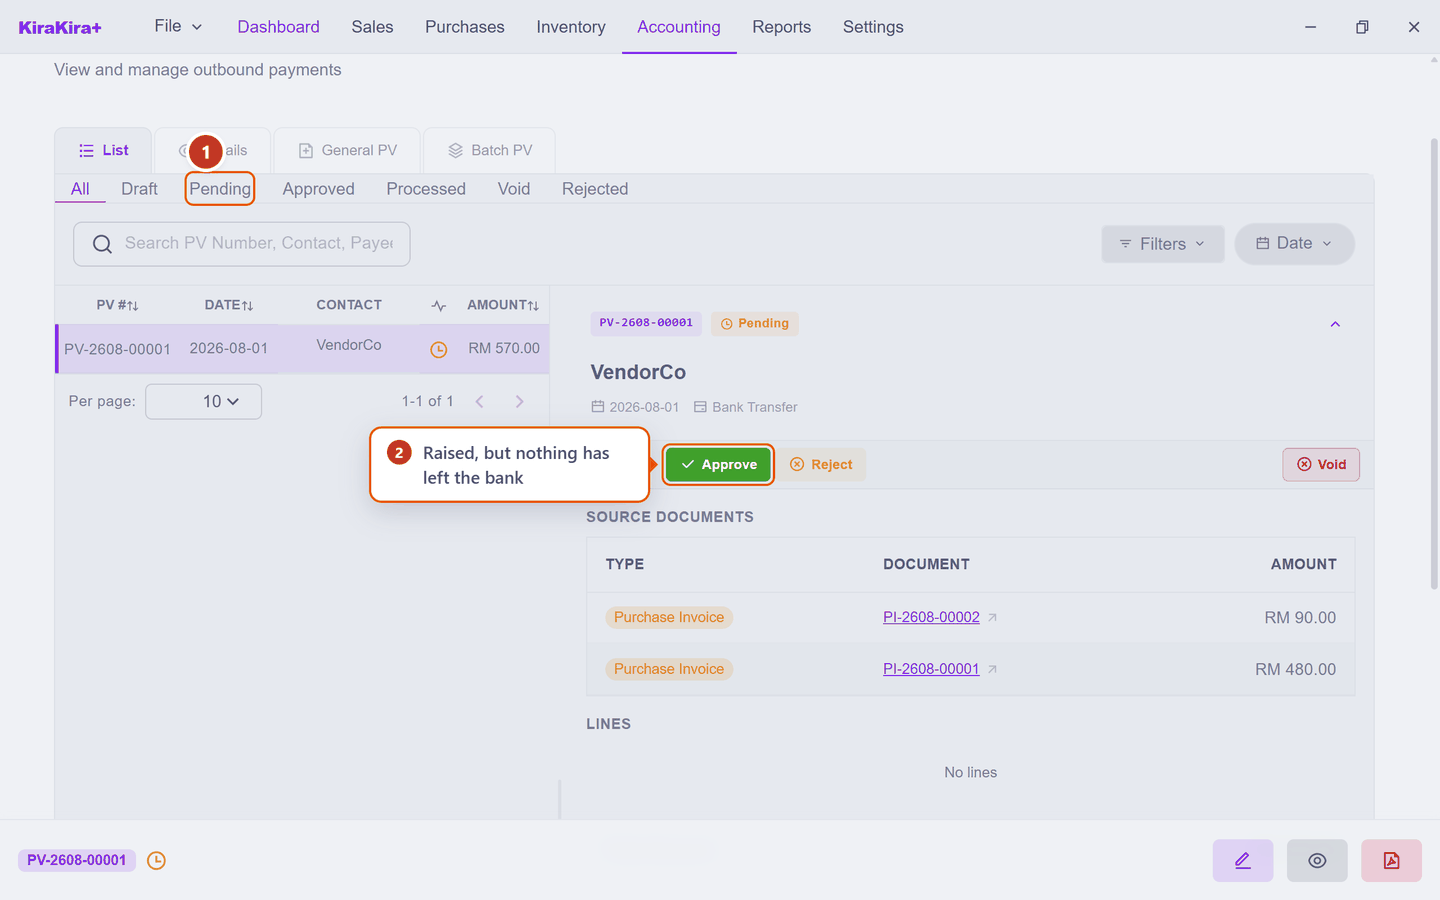
7. Press Approve. The status changes and Process takes over.
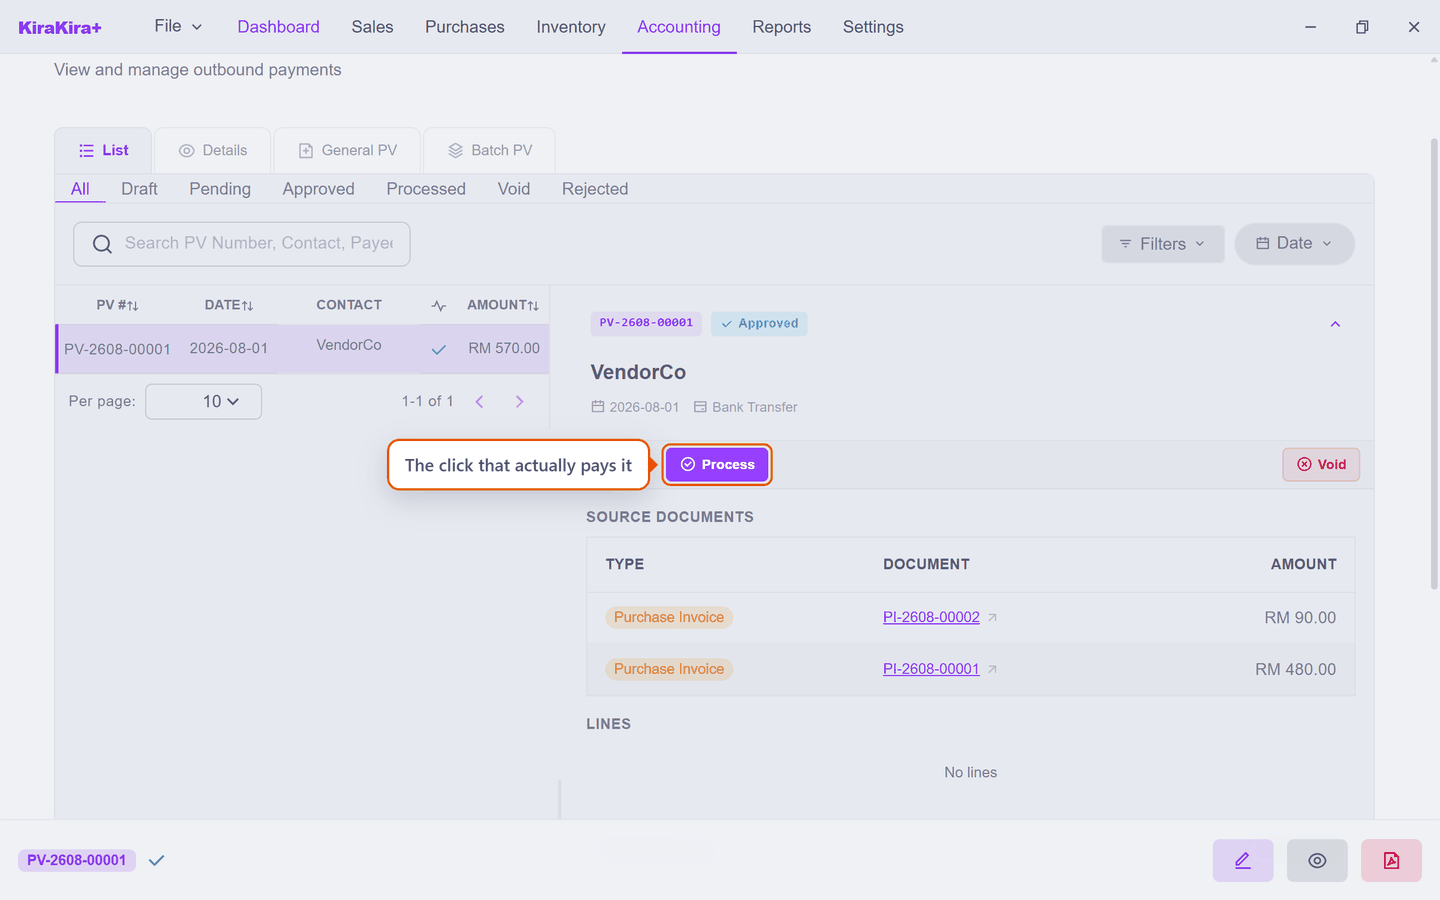
8. Press Process. The dialog says plainly what it is about to do — this is the click that writes the journal entry.
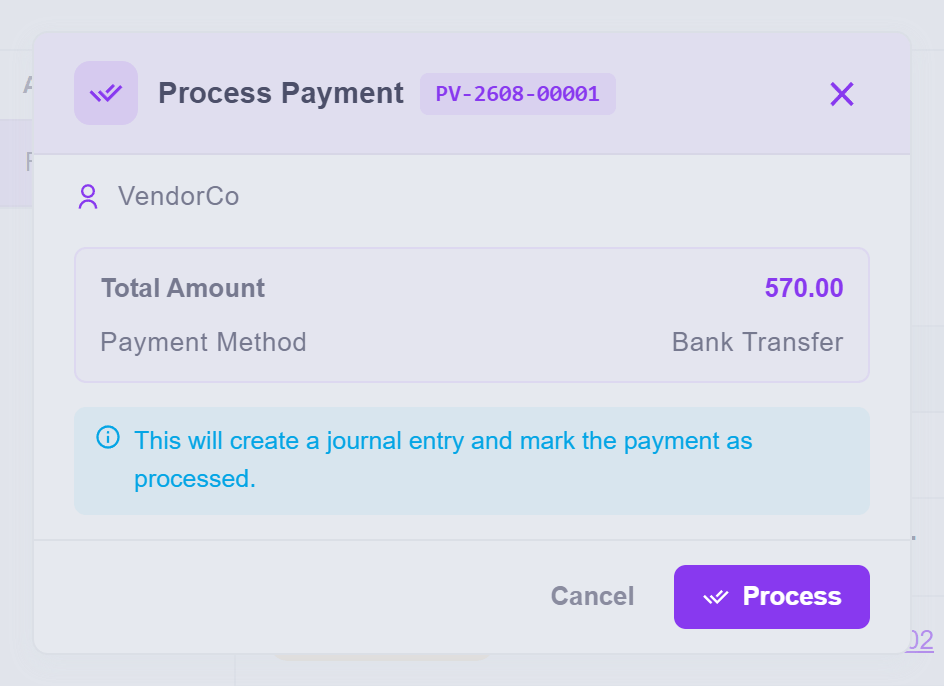
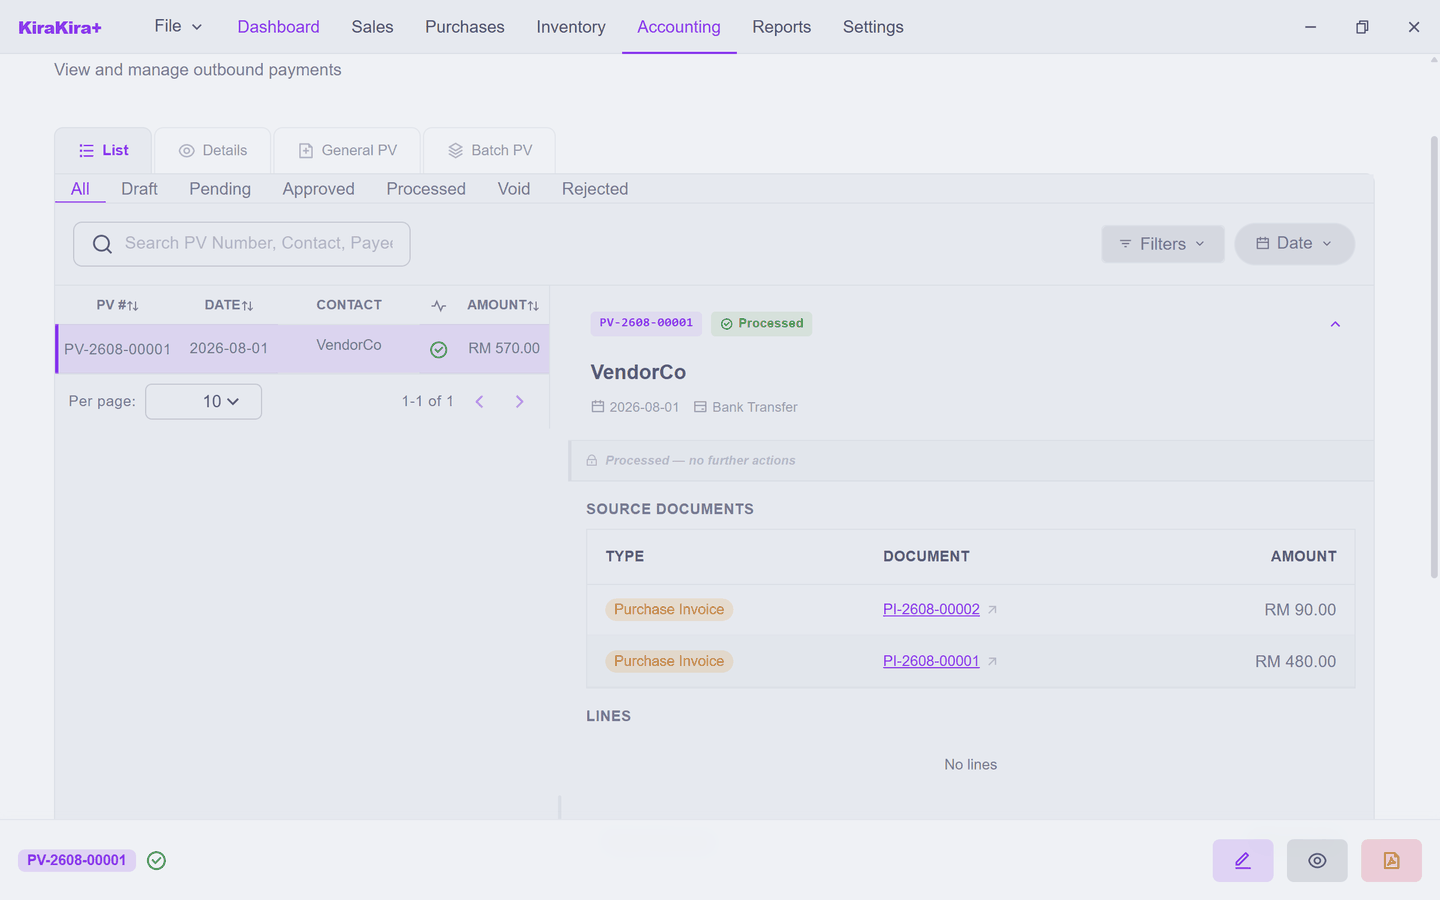
9. Confirm, and the voucher is finished.
Check it worked. Purchases → Purchase Inv now reads PAID 2 · RM 570 and OUTSTANDING RM 0:
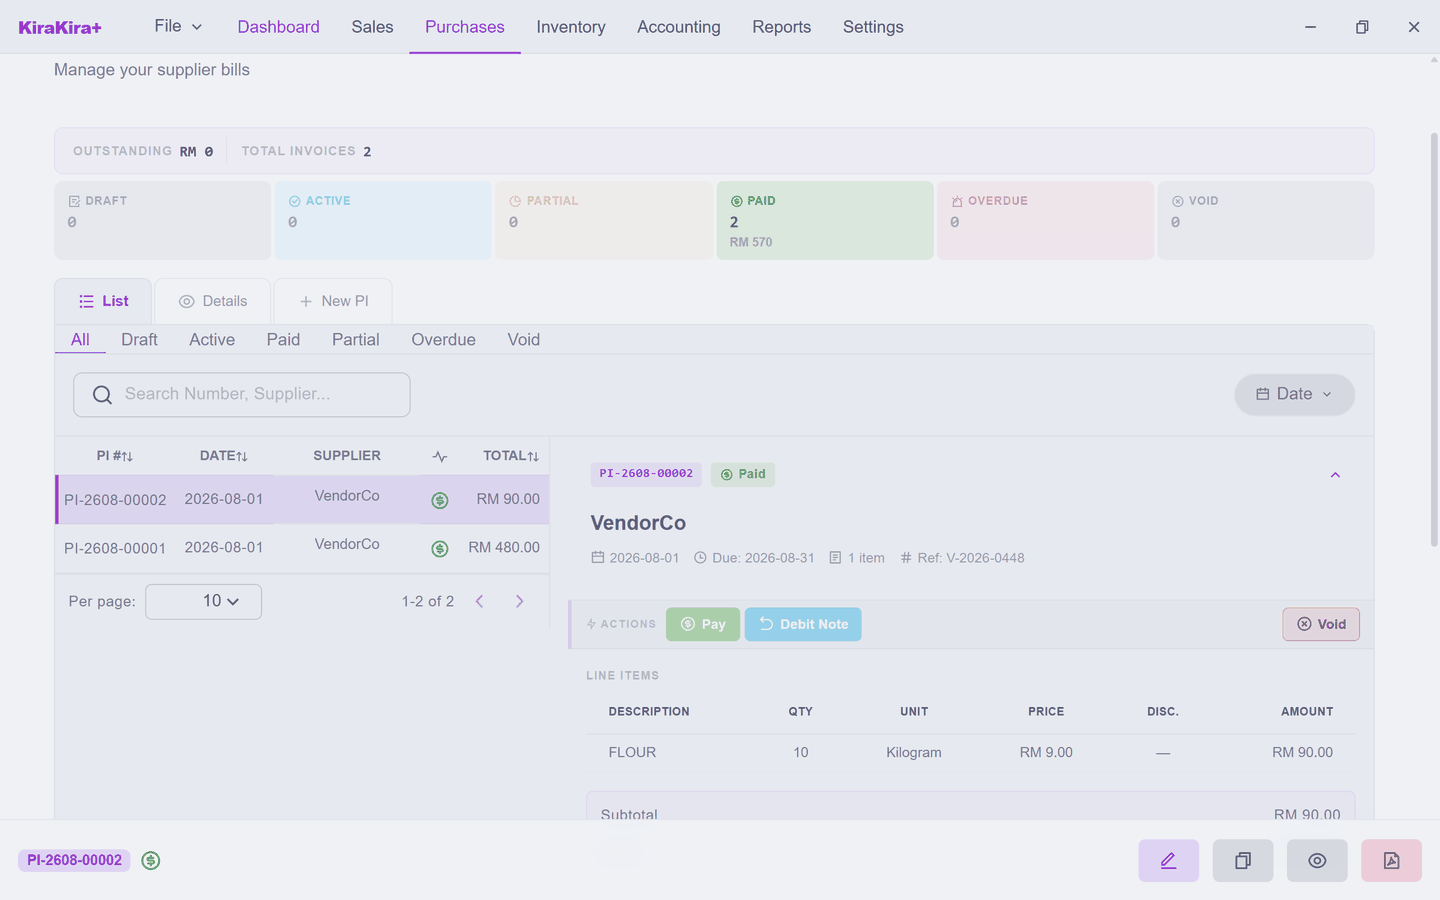
The expense itself did not move. It stayed on the days VendorCo billed you, which is where it belongs.
Scenario — Seri Maju pays the July rent
RM 1,200 to the landlord. No bill was ever entered, and none needs to be.
Part 1 — make sure the account exists
Seri Maju's chart has no rent account yet, and there is nothing to code the payment to. So create one first.
1. Accounting → Chart of Accounts, then New Account.
2. Type the Account Code (6100) and Account Name (Rent Expense).
3. Pick the Expenses category. Do this before choosing a parent — the parent list only offers accounts from the category you have chosen, and the dialog opens on Assets.
4. Choose the Parent Account to file it under, then Create Account.
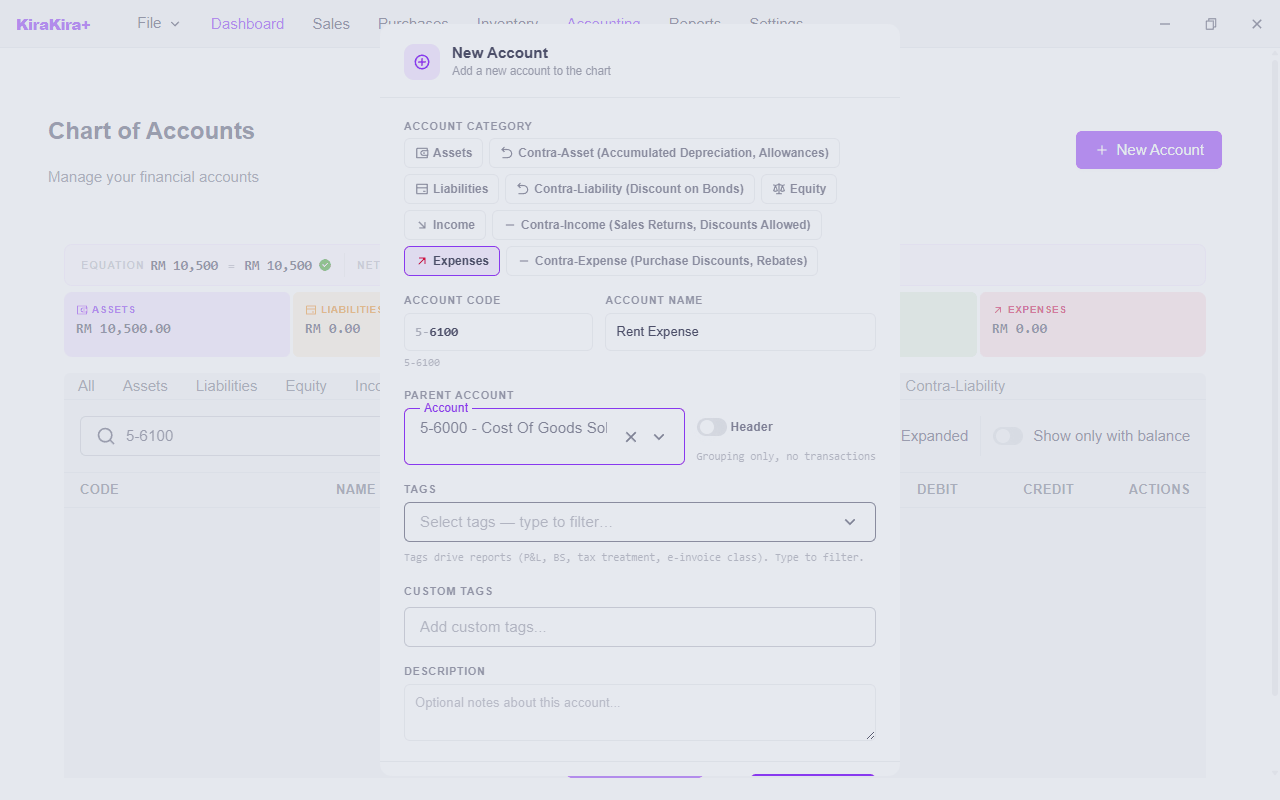
Part 2 — write the voucher
5. Accounting → Payment Voucher, then the General PV tab.
6. The landlord is not a saved supplier, so switch Contact to No and type the name into Payee Name.
7. Set the Date to the day you pay, choose the Payment Method, and put the cheque number in Reference.
8. On the allocation line, click Account and start typing Rent — the list opens on your asset accounts, so an expense will not be visible until you narrow it. Choose Rent Expense, type July rent as the description and 1200 into Amount.
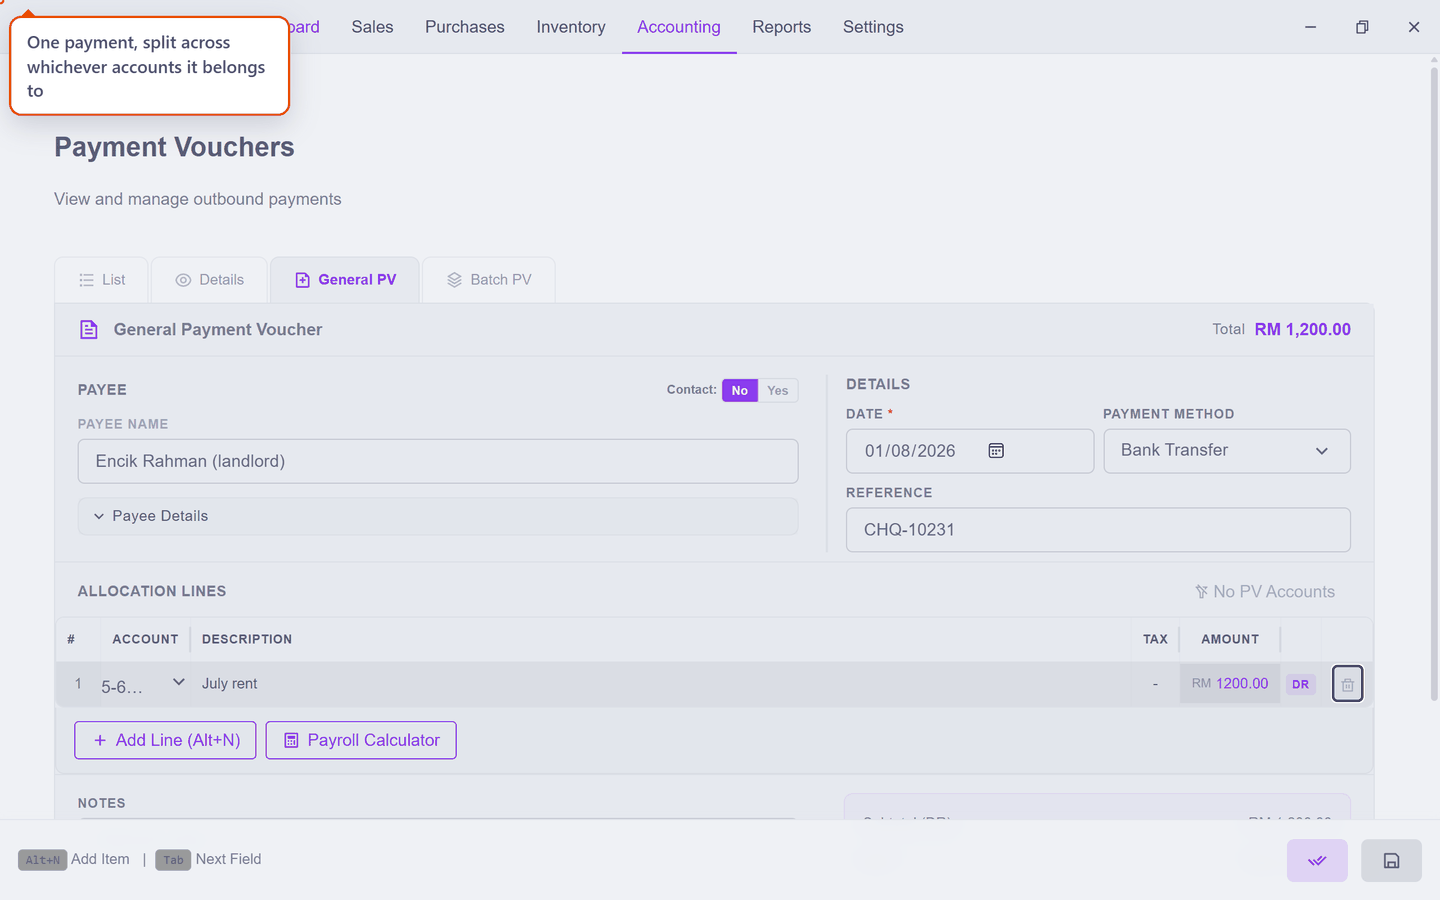
9. Save. Note what you get: a Draft, offering Submit and Delete.
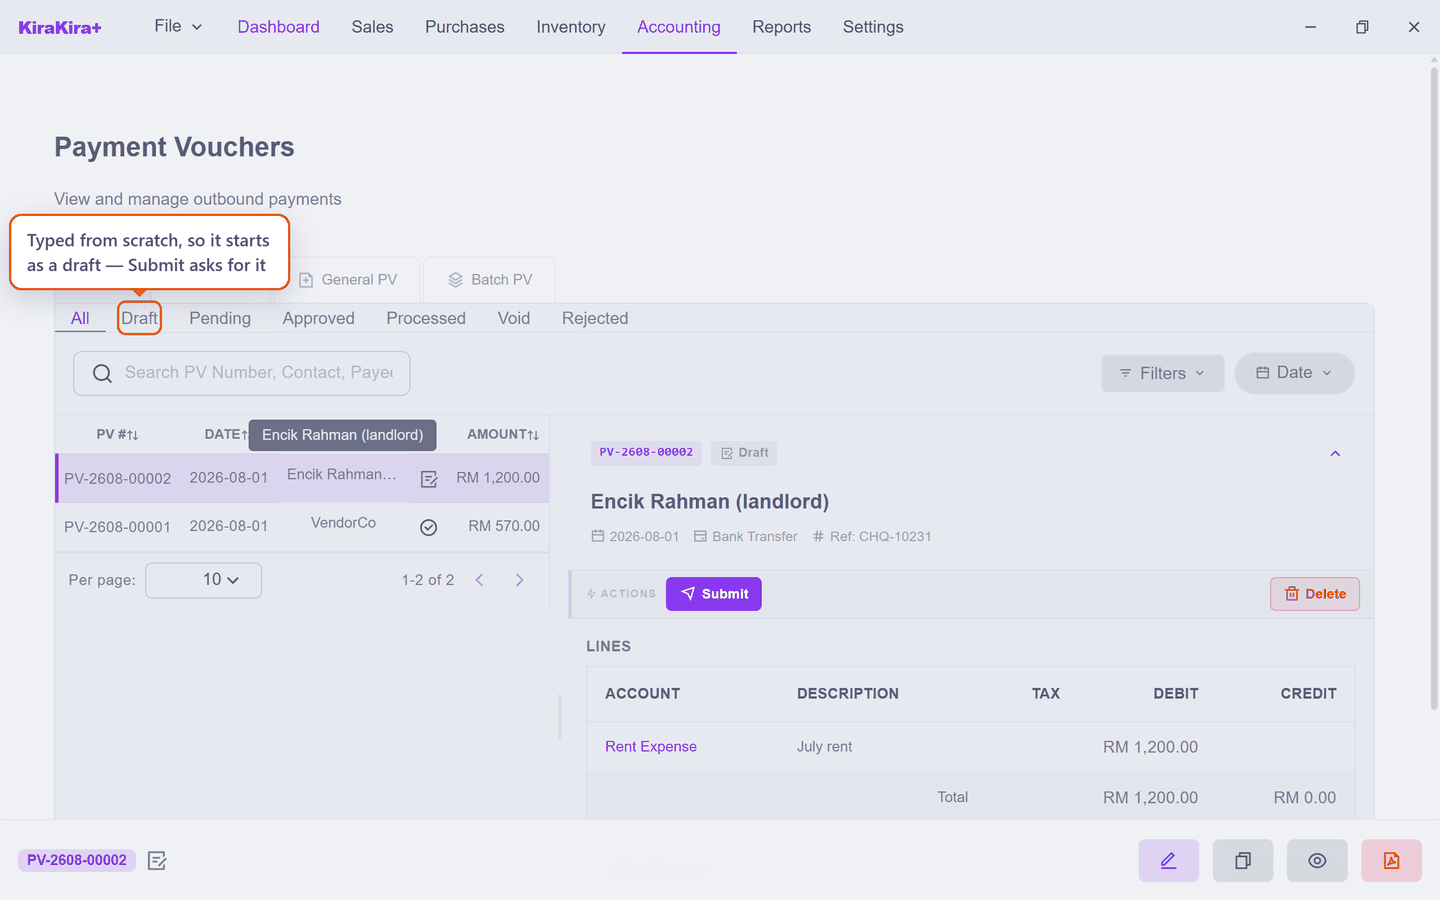
A typed voucher has one extra step
Paying from a bill starts at Pending, because pressing Pay is the request. A voucher you type from scratch has not asked for anything yet, so it begins as a Draft and Submit is what turns it into a request. From there it is the same: Approve, then Process.
10. Submit, then Approve, then Process.
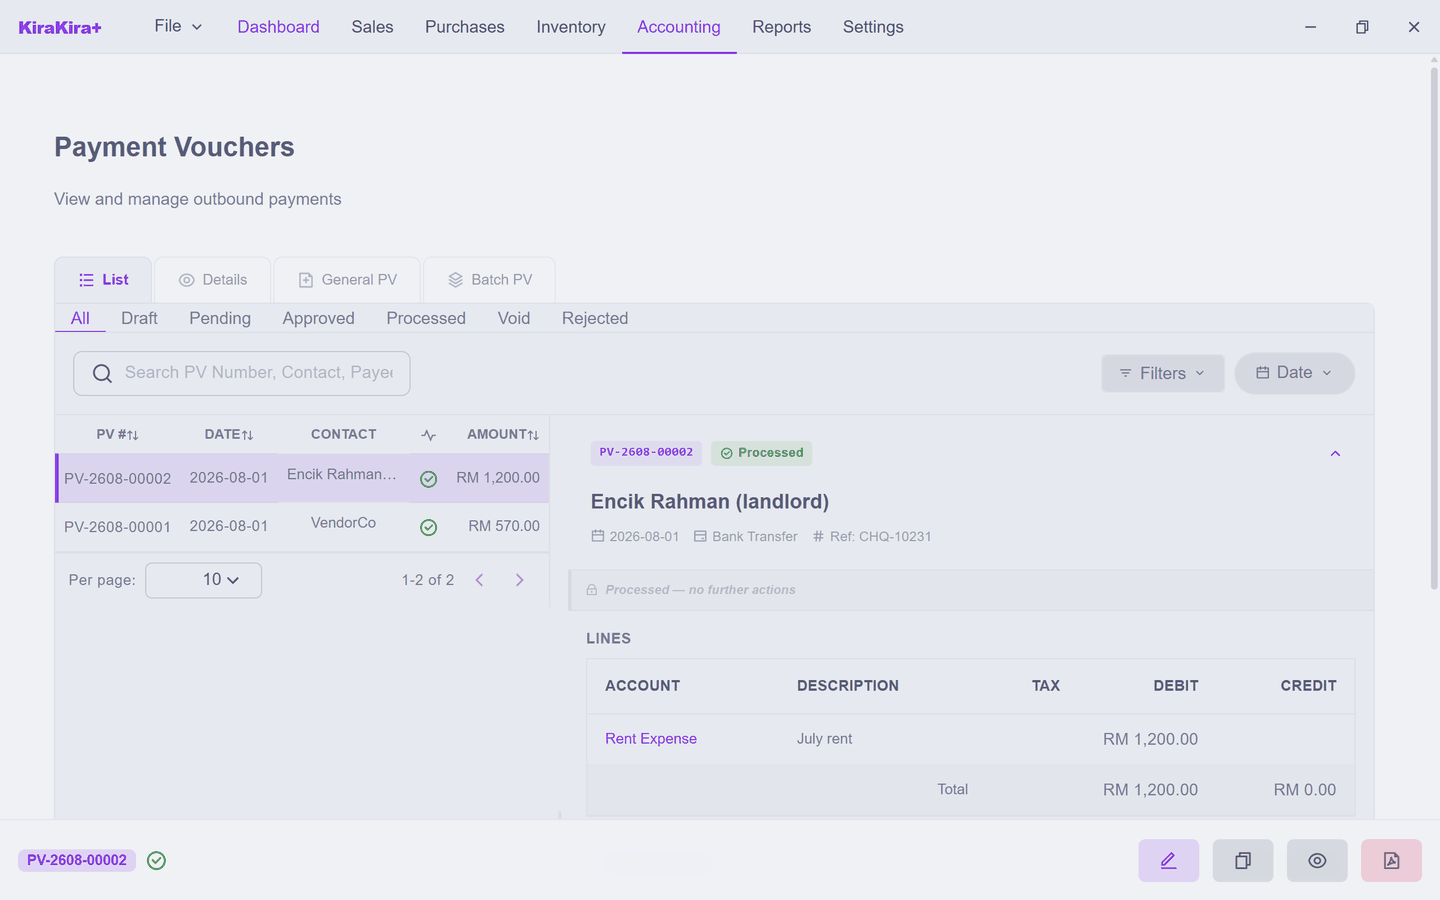
Check it worked. The voucher reads Processed — no further actions, your bank is RM 1,200 lower, and Rent Expense shows RM 1,200 on the Profit & Loss for the month you paid it. The View journal entry link shows exactly what was posted.
Next: Debit Notes.